


(Update: If you prefer to listen and learn, watch The Takeup Episode 11- Patches: The Emblematic Embroidery Item, and Episode 12: Making Patches with Machine Embroidery, Part 2 – Digitizing Tips )
I can teach anything, as long as I also leave time to teach patches.
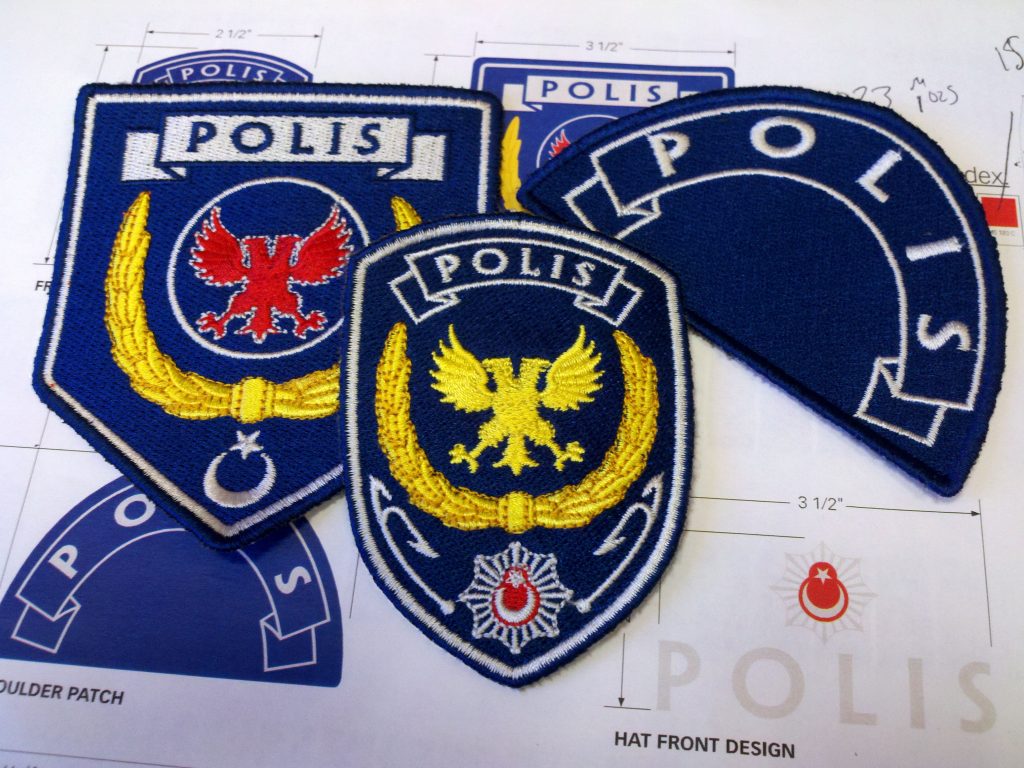
I believe that everyone who threads a needle will eventually want to make patches with their embroidery machine. No matter what I’m teaching at any tradeshow, creating clean-edged emblems will always come up. When seminar attendees spot my custom-shaped patch samples, I know I’ll be teaching a post-session patch lesson.
Traditional vs. Embroidered Edge
Traditional patches have their edge stitching applied after the patch is stitched and cut from a span. This method requires patch-makers to invest in a Merrow machine. It means hand-guiding each patch through that machine to get the classic wrapped edge. Even so, most embroiderers I educate are eager to finish patches without manually handling each piece or adding equipment. Today, I’m talking to them. I’m talking to the small-run, occasional badge creators. The ones who ask, ‘How can I make patches with only my existing embroidery equipment?” I’m talking to the intrepid souls who just want to make a few patches. Creative stitchers determined to edge a shape impossible to run through the overlock machine also benefit from these techniques. I’m here for all who ask “How can I get a clean edge without cutting? For these folks, making embroidered-edge patches makes a great deal of sense.
Luckily, making embroidered-edge patches and badges isn’t terribly difficult. Any one of a few methods will result in a clean-edged emblem on any embroidery machine. Moreover, you won’t have to carefully cut around borders if you use some easily-acquired materials. If you can surround your design with a wide (generally more than 3mm) full-density satin-stitch-like edge to capture the fibers in your patch material, you can make a patch with no more than your embroidery machine and a scissor. With the right support materials, you can even make a free-standing, thread-only patch without the need for cutting fabric.
The Patch-Making Process
The patch-making process is generally more forgiving than direct garment embroidery. Patches are traditionally executed on materials both smooth in texture and dimensionally stable, meaning that there’s less distortion during stitching. All in all, if you can follow simple directions, you can make a decent patch with relative ease. Production steps vary little with the materials covered herein, so I’ll start with the basics and then explain the variations.
Seven Simple Steps to Stitching Patches on Removable Stabilizers
At its most basic, patch-making with easily removed or soluble stabilizers takes just seven steps.
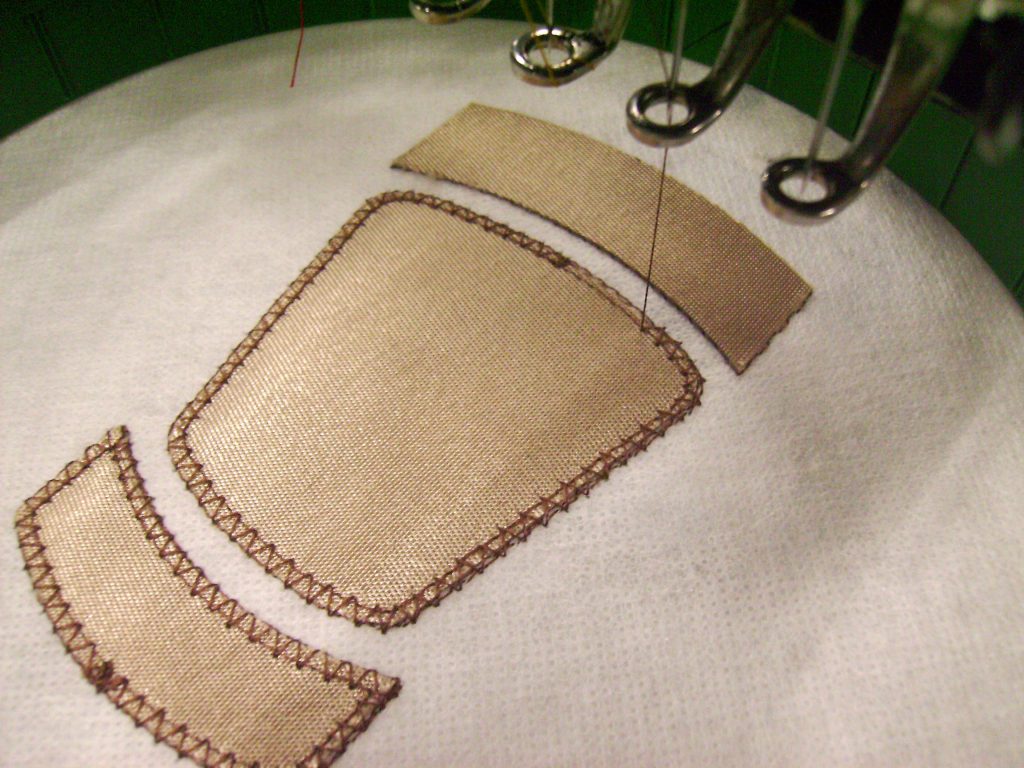
- Hoop the proper stabilizer or other support material. To obtain the clean, thread-wrapped edge, you can use a water-soluble stabilizer that melts away when washed/rinsed, a plastic film that tears cleanly away after stitching, or a polyolefin film that tears away but uses heat to remove any excess material. For more pliable patches, I often prefer a fibrous water-soluble stabilizer. These fibrous water-soluble materials stand up to the stresses of stitching better than either water-soluble plastic-like films or thinner plastic films.
- Stitch a line to show the placement of the patch material, whether this material is pre-cut or will be cut in the hoop manually or by laser.
- Place the patch material in the hoop, carefully aligning it with the placement stitching to cover the entire placement outline. If the material shifts too easily, you may want to use a light spray of embroidery-specific adhesive to secure it.
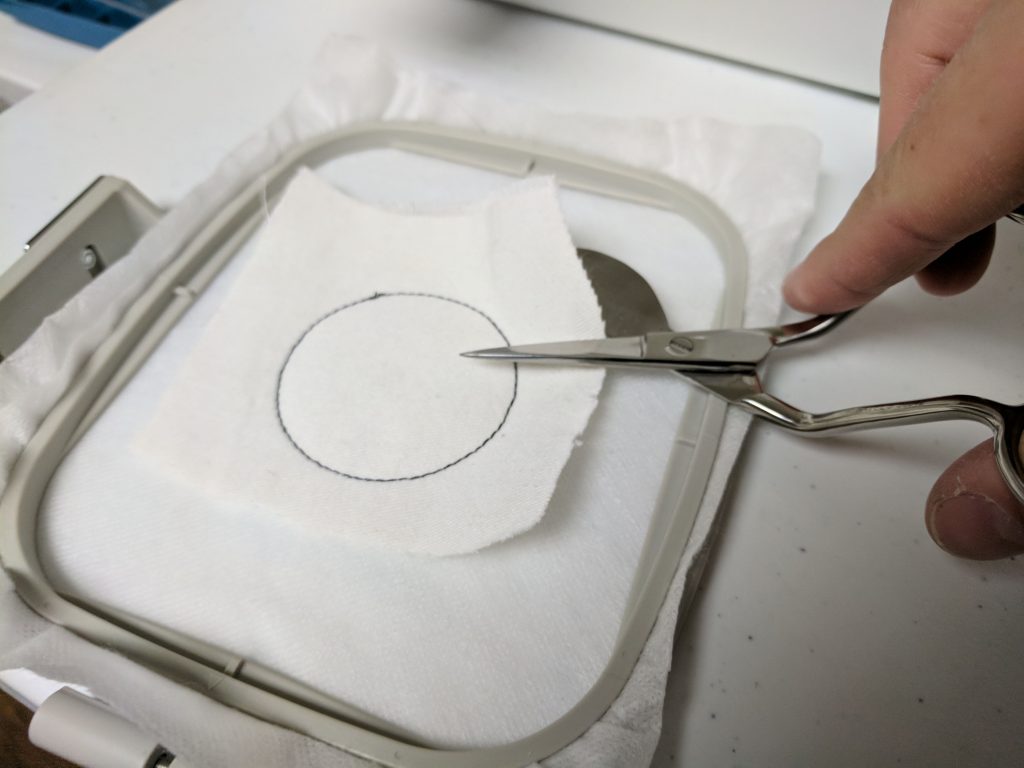
- Stitch a tacking run that holds down the base patch material. For pre-cut materials, this may be a zig-zag stitch. For the hand-cut method, you will usually use 1-3 passes of straight stitch to define the edge of the patch. This creates a clean line against which you can cut. Having a strong ‘edge’ allows you to cut away excess material very close to the stitched outline. When hand-cutting on plastic films, you should be exceedingly careful not to pull, tear, or cut the film.
- Run the central design material in the body of the patch. The main decorative area of the design should usually run before the border. The full-density border column has the most chance of compromising the stabilizer though perforating the patch edge. This can cause a patch to shift or prematurely ‘pop out’. This is particularly important with film-like water soluble stabilizers and plastic films. Moreover, if your design elements intentionally run under the final border, this sequencing is crucial.
- Stitch the final, full-density border. Many digitizers will use a satin stitch, though it has become increasingly popular to use a faux merrowed or textured edge constructed with motifs or through specialty software. I like to use a combination of edge-walk underlay and double zig-zag underlay to give satin borders more body when manually constructing my edge.
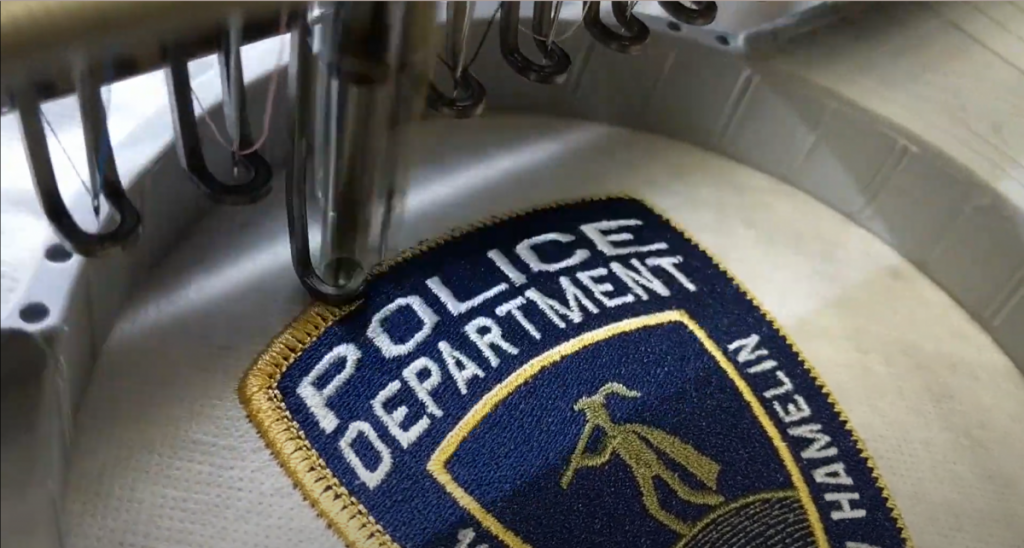
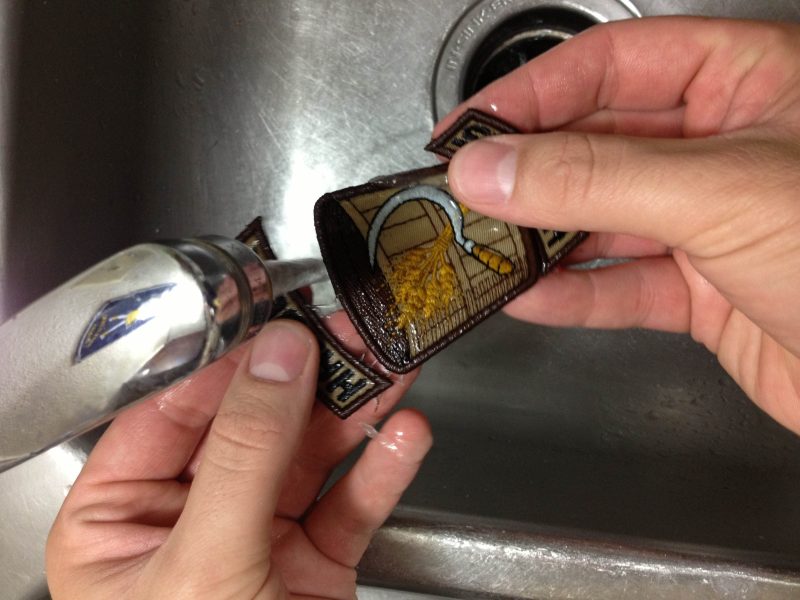
- Release your span from the hoop and remove the excess stabilizer by washing/rinsing it for water-soluble stabilizer, tearing it away for plastic films, or tearing and heating away excess for polyolefin films.
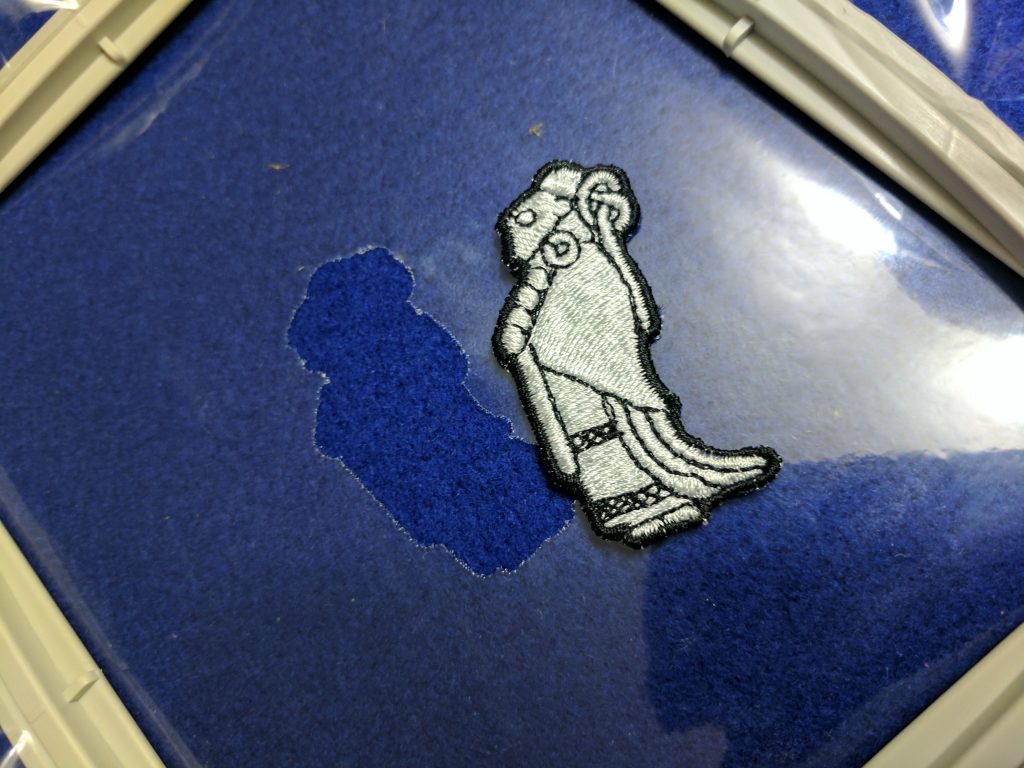
Thread-Only Patches
Though some prefer the thread-only patch making due to the simplicity of its cleanup, it’s also popular for enabling the thread-only patch method. In this method, one trades a much higher stitch count for the freedom of not having to pre- or post-cut a fabric patch as well as the opportunity to make your patch any color you have in your thread collection. Though you can create thread-only patches with water-soluble stabilizer, the remaining material left within the patch provides a more stable, stiffer emblem when creating emblems entirely entirely with embroidery.
Thus, the thread-only patch method usually starts with a span of non-soluble or polyolefin film to as the base material for the patch. While some embroiderers will use a commercial system offering prepared sheets of plastic film, a traditionally hoop holding a span of 20 gauge clear vinyl or the aforementioned polyolefin film will accomplish the same results.
Free-Standing Foundations
To build the body of the thread-only patch, digitizers create a 3 layer underlay mesh with opposing angles underneath the main filled area of the patch design. This mesh, combined with the covering stitches, allows the thread to hold together, stay stable, and have more ‘body’ as a finished piece. Home and craft embroiderers recognize the main background underlay. It’s somewhat similar to the mesh-like support fills used in what are commonly called ‘free-standing lace’ designs. Like those ‘FSL’ designs, the thread is meant to stand largely on its own, even though the material is still present inside the finished piece when using plastic films.

To stitch the thread-only patch, one simply hoops the film, runs the background underlay and fill, moves to the central design, and finishes with the border as usual. Once complete, one tears the patch out of the plastic or polyolefin film, heating the edges of the latter to remove any excess.
Hot Knife Cutting
Many patch-makers use a ‘hot-knife to cut finished patches out of an unbroken span of material. Though it sounds like a specialty tool, the ‘hot-knife’ is essentially a wood-burning pen. This requires the use of polyester materials for your patch as you need a material that cleanly melts and fuses. That said, this removes the need to cut the material either before stitching or executing your border.
Stitched by the Span
To stitch a patch intended for hot-knife cutting, you’ll simply stitch the design, border and all, through your patch material. Once complete, decorators often fuse the stitched span consisting of multiple patches to an adhesive or sealing layer. One then places the material on a smooth, heat-resistant surface like a pane of glass on a desk. All that’s left is to trace each patch carefully and smoothly against the full density border with the hot knife. This melts through the patch material and adhesive, fusing the edges and separating each patch from the span.
Though you may see some remaining material at the edges, cutting through the entire stack of support materials and removing the potential for patches to ‘pop out’ during production makes this an attractive method for many patch-makers. Personally, the increased manual work makes it less attractive for most of my patches than using soluble or film methods. If you want to see how it’s done, check out the following video: Hot Knife Patch Demonstration
Resource Round-up
Rather than belabor the detail or drag you through the finer points of digitizing for patches, I’m going to give some link love to the people for whom I’ve written articles on this topic before. For more detail on my patch making methods, please visit the articles listed below.
The article that started my adventure in teaching patch-making is here: An Indirect Approach to Difficult Substrates – right from the pages of Printwear Magazine. This piece also goes into the technique for using pre-made patch blanks to create your own emblems.
I recapitulated my water-soluble patch method with a summary for the good people at Images Magazine in the UK as well. The material is much the same as the previous piece, but it’s condensed for a quick read: No Catch Patches.
I followed that one up with a treatise on the plastic film methods: The Power of Plastic – again with the good people of Printwear.
Last, but not least, if you want to get in on just what everyone was using these patches for, I even wrote a bit about the rise of the patch trend: Patch it Up: How to get in on the Patch Trend.
What kind of material do you use to embroider your patches on?
Many of the patches I made used polyester twill- particularly that from Stahl’s- https://www.stahls.com/ps-poly-twill-fabric – That said, I have used all manner of materials. I prefer materials that don’t fray. If you are talking about the water-soluble stabilizer, it’s just a fibrous water soluble- in craft stores many people purchase Vilene’s offering, but I used q102 from EnMart- http://www.myenmart.com. 🙂 Feel free to contact me at the contact form if you have questions.
If I am using a fabric background, I prefer a nice, stable polyester twill. You can use anything that resists fraying with ease, but poly twill is a classic choice and has a fine texture that won’t interfere with your design. Many folks will use a coarse canvas and hate the rough edges caused bye needle deflection in the piece. If you want a stiff patch, that’s better done by applying a stiff material to the back before you finish the border rather than stitching through an overly dense or coarse material for the entire design.
Erich, where is a good source for a bright white polyester twill fabric for making patches as you have shown? It’s difficult purchasing material online because you can’t tell the weight of the material.
If you are looking for a matte finish, classic polyester patch material, EnMart has some sheets that friends of mine really enjoy here: https://store.myenmart.com/12-x-17-blank-patch-fabric-sheets-p2920.aspx – That said, I was using a roll-fed cutter for many of patches and utilized the PS PolyTwill from Stahls – https://www.stahls.com/ps-poly-twill-fabric – It’s lighter-weight and rather shiny; not everyone loves the look, but it cuts easy on a plotter-cutter.
what about felt, is that good to use for patches. I have tried canvas, but the edges always seem to fray even after the satin stitch….by the way, thank you so much for the article, by far THE BEST I have read….
You can certainly use felt for patches; I’ve done many patches with no edging and used a simple stitch line to mark the edge for hand-cuts, seeing as felt doesn’t fray after the cutout process. It’s really great material and is often used for chenille patches like those seen on letter jackets. I haven’t done much with edging felt patches, but I assume it would be just as nice. Thank you so much for your wonderful comment. I’m happy to have been able to help. 🙂
I really enjoy using felt…it melts and creates a clean patch
I need to embroider a full back on an expensive leather jacket. Do I embroider directly on the jacket or would a patch be better? And if so, what is the best way to attach the patch to the jacket?
What one of the Stahls twill do you recommend for patches that are cut with a plotter
The patches seen here use the Pressure Sensitive Poly Twill. Be aware that it had a shine that not every customer loves, but it is one of the simplest materials to use.
My worry about using vinyl is if it is iron on…won’t it melt?
Hi Erich – Nice instructions above, nicely worded and actually helpful! I do have on question have you any experience in putting patches onto caps after the patch is made?
Thanks in advance
Absolutely; I have a tiny blurb about it on the Printwear site that might even help you figure it out. If not, contact me at page linked above. https://printwearmag.com/question-answers/what-easiest-way-sew-round-patches-hats – That’s the article, though there are other methods and more you can do to get that flat surface you need.
Where do you buy industrial vinyl set up mentioned in your other article?
The patch setup I’m referring to is the MFS from Madeira USA; you can purchase it here: https://www.madeirausa.com/mfs-25-multi-functional-frame.html – feel free to tell them I sent you. 🙂
Erich,
….About the PS- Poly Twill vs. the regular Poly-Twill vs. Un-coated Poly Twill. I’ve mainly been using the regular Poly-Twill (with the light heat adhesive on back). But it sometimes like to muck up the needle. I hoop the poly-twill and cut out the final patches. I love having the heat adhesive on back because when heat pressed it adheres to the stabilizer and makes a nice flat patch with no puckers. But I’m wondering if the Pressure sensitive might be a lighter application of the adhesive and allow it to not gum up needles as easy, or use the un-coated and manual put on coating (before hooping) Thermo-adhesive. I really like some type of adhesive between the stabilizer and fabric. Does your experience suggest which of these twills would be best to cut down on the gummed needle?
For me, the PS definitely gummed up the needle much less than twill with heavier heat adhesives; the classic twill of that sort seemed to suffer from tons of ‘dust’ on the surface of my designs as the needle passed through the adhesive and dragged it up to the surface as well. I heartily suggest trying the PS poly twill.

Does it matter what the back of the patch looks like? My trial patch runs show the tails of the trims Have I missed the statement about what can be done to the back? And yes, I know that patch implies attaching it to something else. Should I not be concerned with what it looks like on the backside? [Waste of a good concern!!] Thanks for your articles…so helpful.
You can clean up the back- as long as you properly tie in and tie of your jumps, you can trim any loose threads. Some folks like to press an adhesive layer to make patches that can be adhered to a garment with heat and pressure, that has the added benefit of sealing in the otherwise ‘messy’ back. That said, I find that if you trim the back, and perhaps even use a bobbin in a similar color to the patch edging for the final border, that even an untreated embroidered patch looks quite good. In truth, you are correct- my method assumes you will be sewing the patch in-place on your garment and the back will be out of sight, but with patch collecting a legitimate hobby, your pieces may be maintained and viewed on their own.
What is the best adhesive layer to use please?
Many people like to use a heat-press applied adhesive like the one linked below; in truth, I am a big proponent of sewing patches on to garments, as I’ve had issues with some adhesives and coated outerwear. https://colmanandcompany.com/HeatSEAL-Yard.html
Hope that helps, Neil! 🙂